

Imagine walking into your sweltering home after a long day, only to be greeted by a wave of oppressive heat. Air conditioners can feel like a luxury when temperatures soar, but what if you could create your own cooling system without breaking the bank? Here’s the bold truth: building a DIY air conditioner is not only possible but surprisingly simple. Using affordable, readily available materials and the same principles that power commercial cooling systems, you can craft a device that delivers refreshing relief in small spaces. It’s a project that’s as practical as it is empowering, especially for those who love a hands-on solution to life’s everyday challenges.
In this video tutorial, Liberty Engine Project explains how to construct a compact, cost-effective air conditioner that’s powered by the science of the refrigeration cycle. From shaping copper tubing into a heat-absorbing spiral to harnessing the cooling power of isobutane, this guide will walk you through every step of the process. You’ll learn how to assemble the components, optimize the system’s performance, and enjoy the satisfaction of creating something both functional and innovative. Whether you’re looking to cool a small room, chill beverages, or simply explore the mechanics of refrigeration, this DIY project offers a fascinating and rewarding experience. So, what could be more satisfying than beating the heat with a device you built yourself?
DIY Air Conditioner Guide
TL;DR Key Takeaways :
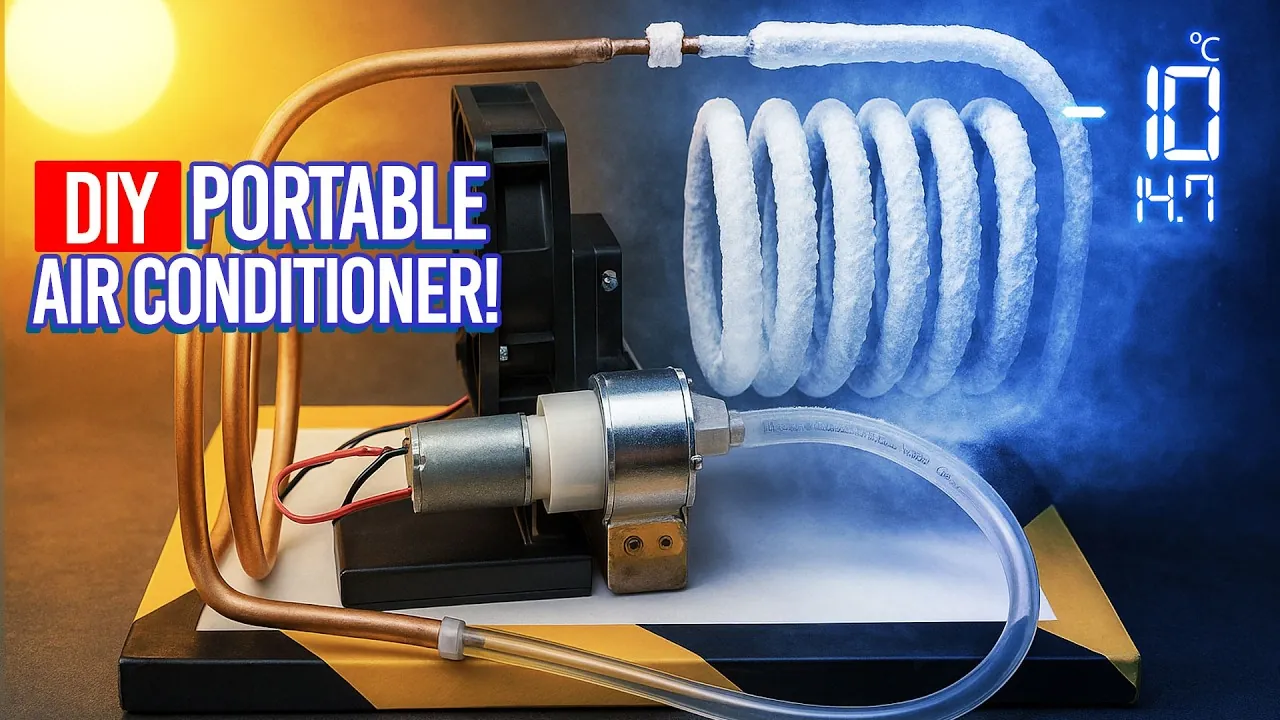
- The DIY air conditioner operates on the refrigeration cycle, using isobutane as the cooling agent to achieve temperatures as low as -10°C through evaporation and condensation processes.
- Key materials required include copper tubing, PVC pipes, a 12-volt fan, an air pump, a 9-volt battery, isobutane, soldering tools, a wooden base, and cable ties, all of which are cost-effective and widely available.
- The system’s core components, the evaporator and condenser, are constructed using copper tubing to assist efficient heat absorption and dissipation.
- Assembly involves mounting components on a wooden base, securing them with PVC pipes and cable ties, and connecting the air pump and fan for optimal cooling performance.
- This compact, portable, and cost-effective air conditioner is ideal for cooling small spaces or beverages, offering high efficiency and versatility in application.
Understanding the Refrigeration Cycle
The refrigeration cycle is the fundamental principle behind your homemade air conditioner. It operates by cycling a cooling agent, such as isobutane, through two key processes: evaporation and condensation. During evaporation, the isobutane absorbs heat from the surrounding air, effectively cooling it. In the condensation phase, the absorbed heat is released elsewhere, completing the cycle. This process is the foundation of most modern cooling systems and is integral to the functionality of the DIY air conditioner you’ll build.
Materials You’ll Need
Before starting, gather the following materials to ensure a smooth assembly process:
- Copper tubing: Essential for creating the evaporator and condenser, which assist heat exchange.
- PVC pipe: Provides structural support to hold the components in place.
- 12-volt fan: Circulates air efficiently to enhance cooling performance.
- Air pump: Moves the isobutane through the system, allowing the refrigeration cycle.
- 9-volt battery: Powers the fan and air pump, making sure portability and ease of use.
- Isobutane: Serves as the cooling agent due to its excellent heat absorption properties.
- Soldering tools: Ensures secure and leak-proof connections between components.
- Wooden base: Provides a stable platform to mount the system components.
- Cable ties: Adds extra stability to keep the setup secure.
These materials are cost-effective and widely available, making this project accessible to most DIY enthusiasts.
Step-by-Step Guide to Building a DIY Air Conditioner

Discover other guides from our vast content that could be of interest on energy.
1: Constructing the Evaporator and Condenser
The evaporator and condenser are the core components of your air conditioner. Follow these steps to build them:
- Evaporator: Shape the copper tubing into a spiral. This spiral will act as the cooling element, where isobutane absorbs heat from the surrounding air.
- Condenser: Create a wider copper tubing circuit to assist heat dissipation. This ensures the efficient transfer of heat out of the system.
- Use soldering tools to securely connect the tubing, preventing leaks and making sure proper functionality.
By carefully constructing these components, you’ll lay the foundation for an efficient cooling system.
2: Assembling the Air Conditioner
Once the evaporator and condenser are ready, it’s time to assemble the entire system. Follow these steps:
- Mount the evaporator and condenser onto a sturdy wooden base to provide stability.
- Secure the components using PVC pipes and cable ties to keep them firmly in place.
- Position the 12-volt fan near the evaporator to circulate air effectively and enhance cooling.
- Connect the air pump to the system to move isobutane through the copper tubing, allowing the refrigeration cycle.
- Power the system using a 9-volt battery, making sure portability and ease of operation.
Ensure all components are securely fastened and aligned to optimize the system’s performance and prevent operational issues.
3: Operating Your DIY Air Conditioner
Once assembled, your air conditioner is ready to use. Follow these steps to operate it:
- Turn on the air pump to circulate isobutane through the system, initiating the refrigeration cycle.
- Switch on the fan to distribute the cooled air into your space effectively.
- Monitor the system for proper operation, checking for any leaks or inefficiencies that may affect performance.
As the isobutane evaporates, it absorbs heat from the surrounding air, cooling it. The fan then distributes this cooled air, providing immediate relief from high temperatures. With proper assembly and maintenance, this system can effectively cool small spaces or even beverages.
Why This DIY Air Conditioner is Effective
This homemade air conditioner is a practical and efficient solution for cooling small spaces. Here are the key reasons why it works so well:
- High efficiency: The use of copper tubing and isobutane ensures maximum heat transfer, resulting in effective cooling.
- Compact design: The system is small and portable, making it ideal for personal use in tight spaces.
- Cost-effective: The materials are inexpensive, and the system is powered by a simple 9-volt battery, reducing operational costs.
- Versatile application: This air conditioner can be used to cool small rooms, beverages, or other localized areas, offering flexibility in its usage.
By using the principles of the refrigeration cycle and using affordable materials, this DIY air conditioner provides an accessible and sustainable way to stay cool. Whether you’re looking to beat the heat in a small space or chill drinks for an outdoor gathering, this system offers a reliable and efficient solution.
Media Credit: The Liberty Engine Project
Filed Under: DIY Projects, Gadgets News, Guides, Hardware
Latest Geeky Gadgets Deals
Disclosure: Some of our articles include affiliate links. If you buy something through one of these links, Geeky Gadgets may earn an affiliate commission. Learn about our Disclosure Policy.